 Wildlife
How to use Wildlife Engine
Watch the 10-minute walkthrough, or jump to the step you need. Still stuck? Email [email protected].
Wildlife Engine on Android
Every step on a real phone: first start, analysing an album, reading the results, naming species and every setting. Pick a chapter to start there.
The video plays from YouTube; nothing loads from YouTube until you press play.
The Android guide, step by step
Wildlife Engine rates every wildlife photo on your phone from 1 to 5 stars, keeps the best frames of each burst as Selects, puts the rest in Rejects and names the species, all on the phone. Nothing is uploaded unless you choose to ask the AI for a species name.
Install and first start
Install Wildlife Engine from Google Play (see Download), then:
- Open Wildlife Engine. The welcome screen explains what the app does.
- Tap Allow access to photos.
- Android asks about notifications: tap Allow. You will then see progress while the app works in the background.
- Android asks about photos: tap Allow all. The app needs your whole library to sort it; with limited access it can only see the photos you pick.
- Your albums appear: All photos first, then each folder on the phone with its photo count.
At the bottom are three tabs, Albums, Dates and Species, plus Settings. You need Android 11 or newer and about 400 MB of free space.
Tell the app where you shoot
Set your region once. Species names become far more accurate, because the app only considers species found there.
- Tap Settings and scroll to Where you shoot.
- Type your region and country, for example Nashik, India or Kruger, South Africa.
- Go back. It is saved as you type.
If you leave it empty, the app uses your phone's country.
Analyse an album
Analysis runs on the phone and keeps going when you leave the app. A 30-photo album takes about a minute on a recent phone.
- On Albums, tap an album.
- Tap Analyse N photos (in the background, free). The first photo takes longest while the app gets ready.
- Leave the app if you like. A notification shows Analysing 12 of 30 with a progress bar and a Stop button.
- When it finishes, the notification says Analysed 30 photos. Tap to review Selects and Rejects. Tap it to open the app.
New photos in an album are picked up the next time you analyse it. To redo an album from scratch, open its ⋯ menu and choose Re-analyse all photos here.
Reading the results
| List | What is in it |
|---|---|
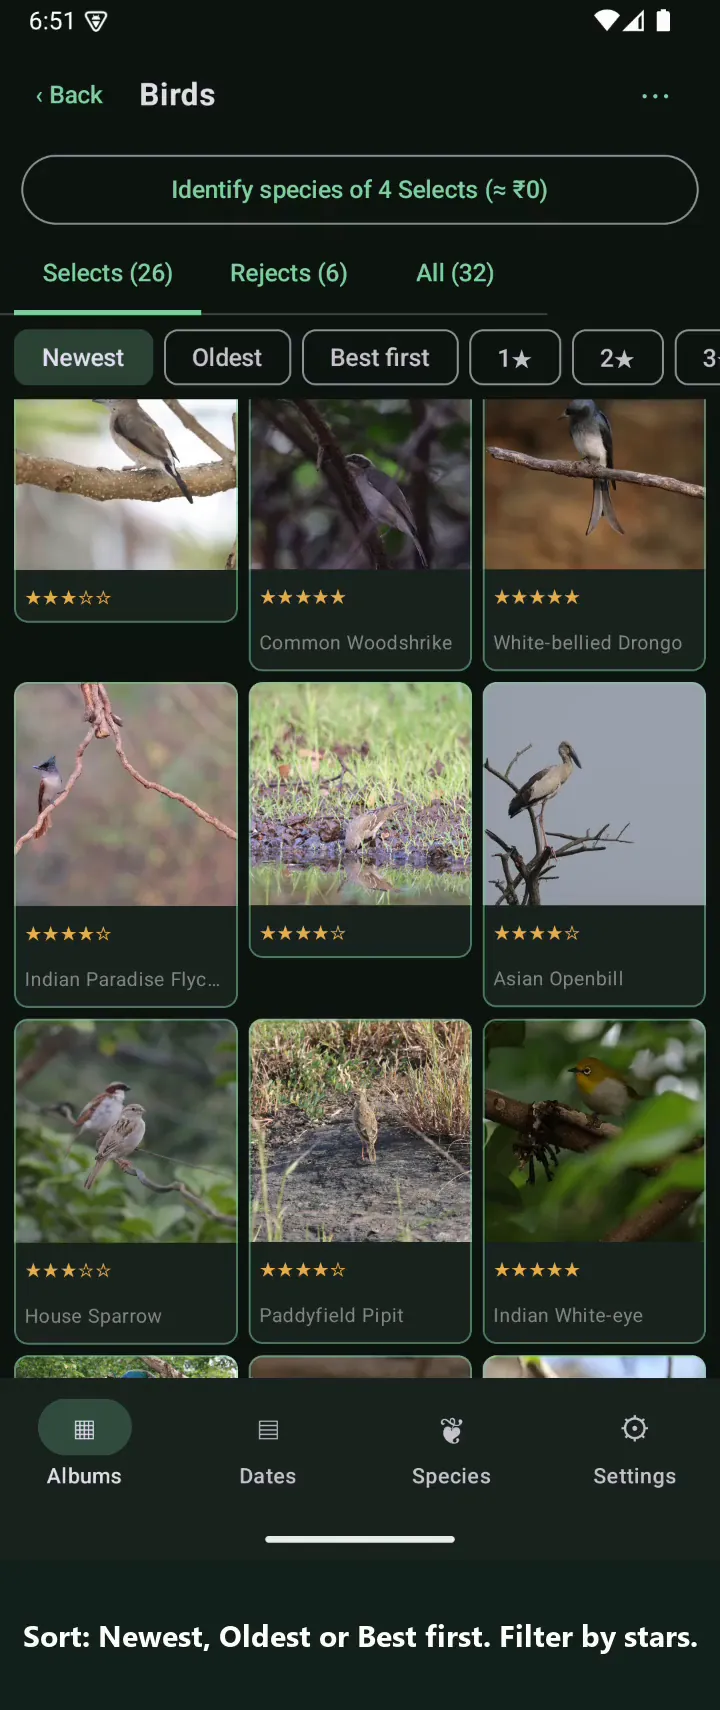
| Selects | Wildlife photos with at least the stars you need (3★ by default), and the best frames of each burst |
| Rejects | Blurred, soft or badly exposed frames, frames below the star limit, and the weaker frames of a burst |
| Category lists | Food, Plants & flowers, Landscapes & places, People and others (see Photos that are not wildlife) |
| All | Everything in the album |
Every analysed photo gets 1 to 5 stars and lands in one list. Nothing is ever deleted or moved on your phone.
Stars come from sharpness, exposure and the eye. Two rules cap a photo at 2★: the eye can't be seen, or the animal fills too little of the frame. Both can be changed in Settings.
Bursts: photos taken a moment apart are grouped. The best frames (2 by default) are kept and the rest go to Rejects; the viewer shows #2 in burst.
Sorting and filters sit above the photos: Newest, Oldest, Best first, a star filter from 1★ to 5★ (scroll the row sideways), and Named for photos that have a species.
The photo viewer
Tap any photo to open it full screen. Swipe left or right for the next one, pinch to zoom and double-tap to fit. Under the photo you see:
- the file name, the stars, animal found and whether it is a Select or a Reject;
- the species and how sure the phone is, for example Common Emerald Dove · 99% (on phone);
- the reasons behind the stars, for example Sharpness 76% · Exposure 99% · sharp · eye visible;
- Also in: other lists the photo belongs to, such as Plants & flowers for a bird among flowers.
Select and Reject at the bottom overrule the app for this photo. Name… (or Change… when it has a name) lets you pick or type the species. The ⋯ menu at the top right has:
| Menu item | What it does |
|---|---|
| Open with… | Opens the photo in another app, such as your gallery |
| Edit in… | Opens it in an editor such as Lightroom or Snapseed, which saves its own edited copy |
| Share… | Sends it to any app, such as WhatsApp or email |
| Identify species (AI) | Sends just this photo to the AI for a species name (needs your own AI key; see Species names) |
| Move to Trash… | Moves it to the phone's trash after Android asks you to confirm |
Selecting several photos
Press and hold a photo to start selecting, then tap more photos; the top bar shows 2 selected. In the ⋯ menu of that bar you can:
- Mark as Select or Mark as Reject: your choice always wins over the app's.
- Back to automatic: undo your choice and let the app decide again.
- Share… or Move to Trash… all of them at once.
Press the phone's Back button to stop selecting.
Photos that are not wildlife
Photos without wildlife get their own lists next to Selects and Rejects, and they are never sent for species names.
| List | Examples |
|---|---|
| People | Portraits, groups, selfies |
| Pets & animals | Dogs, cats, cows, goats |
| Food | Plates, drinks, fruit, cakes |
| Plants & flowers | Flowers, leaves, trees, mushrooms |
| Landscapes & places | Mountains, sunsets, beaches, buildings, roads |
| Nature & outdoors | Outdoor scenes without an animal |
| Documents & screens | Screenshots, receipts, pages, posters |
| Other | Everything else |
A photo can appear in more than one list: a bird among flowers is a Select and is Also in Plants & flowers. Only lists that have photos are shown; scroll the row of lists sideways to see them all.
Photos taken with a camera are treated as wildlife whenever the app is unsure, so a hidden bird is not lost. If a photo lands in the wrong list, open it and tap Select or Reject, or use Identify species (AI): a photo that gets an animal's name moves to wildlife. To keep everything in Selects and Rejects, turn off Sort non-wildlife into categories in Settings.
Species names
The phone names most species by itself, free and offline. The AI is an optional extra for the ones it is unsure about.
On the phone (free). While analysing, the app names each animal it is sure about, shown as 99% (on phone). Unsure ones stay not named. Setting Where you shoot makes these names much more accurate.
Name it yourself. Open the photo, tap Name… or Change… and type; suggestions from the species list appear as you type. Your names are never overwritten.
With the AI (optional, paid by you). The AI looks at the animal, cropped from the photo, with your region and the date.
- In Settings › Species identification (AI), tap Get a key to create a free key on the AI provider's page, then Add key… and paste it. The key stays encrypted on your phone.
- In an album, tap Identify species of N Selects, or use ⋯ › Identify species (AI) for a single photo.
- Choose Now (names in a few seconds each) or Batch (half price, names arrive within 24 hours; the app checks by itself).
The AI provider bills your own account, about ₹0.12 (a fraction of a US cent) per photo with the Economy model. The monthly budget stops the AI when it is used up. With One photo per burst on, only the best frame of each burst is sent and the others get its name free.
The Species tab lists every species in your photos with its scientific name and photo count; tap one to see all its photos. The Dates tab shows your photos day by day, newest first; tap a day to see it with the same lists, sorting and filters as an album.
Every setting explained
The defaults suit most wildlife photographers. Change a setting and every album is re-sorted at once, without analysing again.
Culling
| Setting | Choices (default in bold) | What it does |
|---|---|---|
| Used for | Photography, Camera trap | Photography keeps the best-looking frames. Camera trap keeps every frame with an animal or a person and rejects empty frames; quality and the eye rule are ignored, and the next four settings are hidden. |
| Eye must be visible | On, Off | Frames where the animal's eye can't be seen get at most 2★, and a frame showing the eye ranks first in its burst. |
| Keep per burst | 1, 2, 3, 5, All | How many of the best frames of each burst stay in Selects; the rest go to Rejects. |
| Smallest animal to keep | Off, 0.5%, 1%, 2.5%, 5% | Animals filling less of the frame than this get at most 2★, however sharp. Choose Off or 0.5% if you keep sharp shots of small, distant birds. |
| Stars needed to keep | 2★, 3★, 4★ | Photos rated below this go to Rejects. |
| Sort non-wildlife into categories | On, Off | People, pets, food, places, plants, documents and other photos get their own lists instead of Selects and Rejects, and are never sent for species names. |
Species identification (AI)
| Setting | Choices (default in bold) | What it does |
|---|---|---|
| AI key | Add key…, Get a key | Your own key for AI species names. Get a key opens the page where you create one; the key is stored encrypted on this phone only. |
| Model | Economy, Best | Economy costs about ₹0.12 per photo; Best is more accurate and costs more. The cost per photo is shown under the choice. |
| Monthly budget | ₹50, ₹100, ₹250, ₹500, No limit | AI naming stops when this month's spending reaches it. The amount already spent is shown. |
| Where you shoot | Free text, e.g. Nashik, India | Your region, sent with each photo and used for the on-phone names too. Narrows the species a lot. |
| One photo per burst | On, Off | Only the best frame of each burst is sent; the other frames get its name free. |
Help improve and storage
| Setting | What it does |
|---|---|
| Share what the app can learn from (Off, On) | When on, a Share feedback button appears. It prepares a small file for [email protected] with the species names you or the AI gave (as numbers describing the animal, not the photo) and the photos you moved between Selects and Rejects (as sharpness, eye, exposure and stars). Never photos, file names, places, dates or people. You choose whether to send it. |
| Clear all analysis | Forgets every result so photos are analysed again. Your own Select and Reject choices and species names are kept; no photos are deleted. |
Tips and troubleshooting
| If… | Try this |
|---|---|
| Sharp shots of small, distant birds land in Rejects | Settings › Smallest animal to keep › Off or 0.5% |
| Good frames are rejected because the bird looks away | Settings › Eye must be visible › Off |
| You want more frames from each burst | Settings › Keep per burst › 3 or 5 |
| You use a camera trap or do surveys | Settings › Used for › Camera trap |
| A species name is wrong | Open the photo › Change… and pick the right one; check Where you shoot is set |
| A photo is in the wrong list | Open it › Select or Reject, or ⋯ › Identify species (AI) |
| The first photo takes long | Normal: the app gets ready on the first photo, then speeds up |
| No progress notification | Android Settings › Apps › Wildlife Engine › Notifications › allow |
| Analysis stops when the screen is off | Android Settings › Apps › Wildlife Engine › Battery › Unrestricted |
| An album shows only some photos | Android Settings › Apps › Wildlife Engine › Permissions › Photos and videos › Allow all |
More about what stays on your phone: privacy policy.
Windows quick start
Watch the narrated walkthrough (7 minutes): adding a folder, analysing, reviewing, sorting and every setting. The steps below cover a first trip.
- Open Wildlife Engine and choose Add a folder: your memory card or trip folder. RAW, JPEG and RAW+JPEG pairs are read where they are.
- Choose Cull & sort. Every frame gets stars, bursts are grouped and the best frames become Selects.
- Review in the grid. Keys work like Lightroom: 1–5 stars, 0 clear, P pick, X reject, U unflag, ← → move, Enter open, Z zoom, I info.
- Choose Sort files to copy or move photos into date, Selects and species folders. You see a preview first, and a sort can be undone.
- Import into Lightroom Classic, Capture One or Bridge: stars, picks and species come with the XMP sidecars.
- After buying Pro, open Settings › Licence, paste the key from your email and choose Activate.
Still need help?
Email [email protected] with a screenshot and the photo's file name. Please include your phone or computer model and the app version (Settings › About).